Using Masks in Photoshop
1. Open a JPG mask that you would
like to use. I am using one of Rachel’s
Masks RD_mask710.jpg You can see the set here.

2. Open a digital scrap paper you want
to use and resize it to the same size as the mask. Click IMAGE-IMAGE SIZE and change the size from there. (If your paper is an even size on both sides,
like 700x700 or 800x800 skip Step 3a.) I’m
going to just use a color filled canvas for this tutorial.
3. If the mask is an odd size like 610
x 745 or something odd like that. ( I
have run into this)
a. Instead of resizing your paper to
that and distorting it. I just open a
new canvas that size and drag the paper over to that canvas. I select-all and then image-crop. Then select-deselect. Voila!
You have a canvas the same size as your mask and its not distorted!
4. On your digital scrap paper canvas
click the “add a mask” at the bottom of the layer palette, shown in the first image below. You will see a white rectangle box open up
next to your paper in the layer palette like in the second image below.


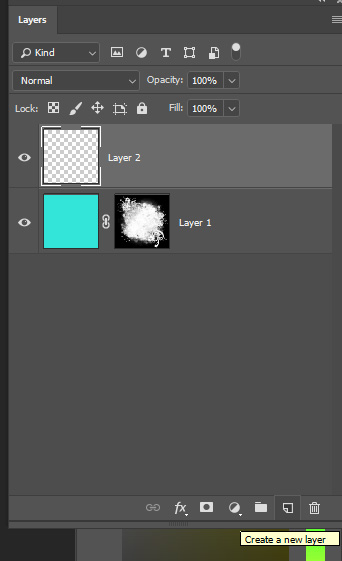
5. Press ALT and click on the white
box in the layer palette, shown below. Your canvas
will turn to the white color. It’s
ok. Your paper is still there. You will still see it in the layer palette.

6. Make your mask canvas active and
click select-all then CTRL-C.

7. Now make your paper canvas active
by clicking somewhere on the top.
CTRL-V. Then you can click somewhere
under your last layer and you will see the masked paper, shown in the images below.


8. I always “add a new layer” then
right-click just to the right of that added new layer, and merge visible. Shown below.

9. Now if you are working on your tag
or whatever, and decide you don’t like the color you chose or the paper you
chose then on your canvas you would open a new layer above the current mask you
have and then flood fill with another color or drag a new digital paper to your
canvas. Your layer palette will look something like this:

10. Then in the layer palette press and hold ALT
and hover over the line in between the paper/color and the mask. You will see a white square pop up and then
you just click. Your new color/paper
will “clip” to the original mask. If you hate it..just delete that added paper
or color and try again. lol The original
mask will still be intact.


Subscribe to:
Posts
(Atom)


very cool
ReplyDeletewow! That was certainly A LOT easier than the webpage I ended up at that had some complicated long drawn out steps LOL!! This is exactly what I needed :) Thanks so much Tammy
ReplyDeleteyou are very welcome ! :)
ReplyDelete